Parlay Discussions Site
Increase, track, and encourage wider participation in online discussions.
Map Testing
Start the year right with a good breakfast and an energizing MAP testing protocol.
Here are some resources to help you.
Making Newscasts in iMovie
https://youtu.be/zEi21okUU9I
https://youtu.be/zEsZyR5eEFo
Overview
Making a newscast is a fun, interesting and challenging way to communicate information to your audience. Here are some tips and suggestions to make your video production outstanding.
Step One
Prepare your script to be read by you and your cohost to the audience. You should try to memorize as much of this script as possible so you can look at the camera.
- Here is a script template for you to download and use. Be sure to share with your cohost so you are working on the same document.
Step Two
Decide what images and pictures you want to use. Your pictures should relate to what you are talking about. For example, if you are talking about rabbits, then you will want pictures of rabbits. Find many different pictures to choose from.
Step Three
Record your script (hopefully you memorized) using iMovie. Be sure to look at the camera as much as possible to keep your audience happy. They want to feel like you are talking to them!
Step Four
Create an introduction with music and lots of flash. You will put this in before you begin recording your script.
Introductions You Can Use
- Watch sample #1. Download if you like it.
- Watch sample #2. Download if you like it.
- Watch sample #3. Download if you like it.
- Watch sample #4. Download if you like it.
Or if you are brave, create your own introduction using this website.You will need to register with the site. Be sure to use your Google Account
Tutorials
Final Tips
- Look directly at the camera as much as possible.
- Look at the camera and your cohost when you are not speaking
- Smile and speak loudly. People love to see a happy person on TV
Are You Using the Read/Write Chrome Extension?
Read/Write is an easy to use and powerful Chrome extension that supports all types of learners in the middle school.
Used in conjunction with Google Docs, Read/Write helps students with
- Speech to text (they talk to the machines)
- Text to speech (they hear the words spoken at various speeds)
- Highlighting and organizing study materials
- Word prediction
- Picture and language based dictionaries
We have a site wide super license that students and teachers can use. Most students already have the extension, but if they don’t, they can go to the Chrome web store and install it for free.
Check out the videos below for more information. The first one features ISB students and teachers. It was shot by a former ISB student.
https://www.youtube.com/watch?v=dbn93cHYTZ0&t=166s
https://youtu.be/4Bp0to8a9Z0
Calamari: ISB’s online leave application
Hat tip to Chad Bates for this information…
We are moving to an online Leave Application system for Certified Staff. This Leave Application System was suggested by the Faculty Association, and is inline with our efforts to better use technology to improve school operations. The system we chose is called ‘Calamari’ (….don’t ask, I have no idea).
Calamari is built on G-Suite, meaning it’s accessible through your School Google account, or if your prefer there is an App for all smart phones. Aside from processing leave applications, Calamari allows you to view your personal accrued leave and approval status.
Take a minute to watch this short video to see how to use the system. If your leave request requires a ‘sub’ we’d ask you still contact Khun Kaew : 087 980 3380 <kamolrak@isb.ac.th>. In the future as we build trust in the system, we believe this can be fully automated an complete online. If you have any questions, feel free to email me.
Configuration for Calamari App: The initial setup of the Calamari App requires a URL, use this address: isbangkok.asia and then login to the App with your School Google login.
Leave Types
|
Leave Type |
Description |
Examples |
|
Sick Leave |
Teachers shall receive sick leave not to exceed thirty (30) working days per year. Sick leave credit shall accumulate to a maximum of ninety (90) working days. Sick leave days are not reimbursable upon termination of service. A physician’s certificate shall be required for absences of three or more consecutive working days |
You have an upset stomach. You go to the doctor to get treatment for the upset stomach. |
|
Immediate Family Sick leave |
Up to 5 days of accrued sick leave per year may be used by the employee to attend to the illness of a spouse or child residing with the employee in Thailand. |
Your child is sick and unable to come to school. They require parental presence either because of their age or the nature of the symptoms. |
|
Personal Leave |
A maximum of three days may be used annually for personal leave. Although a statement of reason for the personal leave is not required, the request for the use of the days should be submitted for approval to the respective school Principal as far in advance as possible. Bookings (e.g. flights) should not be made until approval has been given. The intent is that days may be used for personal matters that cannot be attended to on days when school is in session. Examples of such matters include (but are not limited to), Special family events, Embassy, Banking business, Recruiting, Arrival of movers, Compassionate Leave, Scheduled medical appointments, Physical check‐up. Personal days may not be taken in May or June or immediately preceding or following a school holiday or vacation without approval by the Head of School. |
In order to complete the purchase of a house back home, you have to get particular documents notarized, transfer money at the bank, an/or meet with someone handling the paperwork. All of this can only happen during business hours of a work day. You have a scheduled medical appointment not directly related to a current sick leave or need to have your full physical (the one that takes most of a day). |
|
Bereavement Leave |
A maximum of up to 10 working days shall be allowed for death/ burial/ cremation of an immediate family member. The immediate family is defined as spouse, parents, siblings and children. |
|
|
Professional Leave |
Approval should be obtained in advance by Principal before arrangements are confirmed. |
|
|
Absent with Students |
Attending IASAS/CC event as a coach/supervisor of students Taking students on an off campus field trip – Examples Two day Biology trip to EWC Excursion downtown to ServICE conference Accompanying students on a grade level trip while some of your other classes are still meeting at school, requiring a substitute. |
https://youtu.be/U3ryQgGvTKc
Publishing Your NanoWriMo Work (ES and MS Students)
ES and MS Students
You did it! You survived the month of November and, hopefully, met your goals. If not, no worries you can keep add to our writing during the revision process.
Next up we need to focus on publishing your work. These steps are designed to help you do that.
Want to see some video guides? Scroll all the way to the bottom of this page.
Step One: Download the Nano Wri Mo Guidebook
You have may already have a printed copy, but if you don’t, download the copy for your grade now.
Step Two: Share Your Novel
We are now in the revision process of the writing, so it is important to share your novel with other people and get their feedback. Usually, the best way to do that is to actually print it. So do that now, and give it to a friend or parent to read. Be sure they give you feedback.
It is a good idea to get help with this step. A professional writer always has an editor to check their work and help them with revising their books.
Step Three: Start Editing Your Novel
With the help of a friend, parent, teach and your own brain, start editing your novel. Use the NanoWriMo Guide Book for help.
Remember, this first step is about revising your novel. This is where you:
- Make changes to your plot or characters
- Add chapter breaks if you didn’t already have them
- Change the order of your novel
- Add extra sections so that it makes sense for your readers
It is a good idea to get help with this step. A professional writer always has an editor to check their work and help them with revising their books.
Step Four: Become Friends With Your NanoWriMo Guidebook
Look over your guidebook and see where it can help you. Look for these sections right away:
- Unleash your inner editor (Page 115 ES, Page 90 for MS)
- Cleaning it up (Page 122 for ES, Page 96 for MS)
Step Five: Setup Your CreateSpace Account
NaNoWriMo writers publish their books with CreateSpace. Students will be able to purchase copies of their book for minimal cost, plus shipping.
- Ask your parents (ES) to set up a free CreateSpace account. MS, you can do it on your own. Go to Createspace.com and follow the simple sign up instructions.
- Add a new title.
- Name of the project – use your novel title
- Type of project – paperback
- Choose a setup process – guided
- Video screencast
Step Six: Prepare Your Story For Publishing
- Download a blank Word template and a formatted Word template from CreateSpace. The templates can be found in the ‘Interior’ section of the Setup Process.
- Copy the entire text of your novel and paste it into the blank or formatted Word template. Up to you.
- The formatted template is just for you to refer to so you can see how your novel should be laid out. Use it to check how you should set out your copyright page, acknowledgments, title page, and contents page (if you have one).
- Format your novel to match the example in the formatted template. Make sure each chapter starts on a new page.
- Upload your new novel document to CreateSpace.
- Use the Interior Reviewer tool to check how your novel will look when printed.
- Or use the ones we have here that we grabbed for you
Step Seven: Design Your Cover
- Use the Cover Creator on CreateSpace to design your cover.
- First, choose your design. There are 30 different designs to choose from. Each design can be further customized with different colors, layout, and pictures.
- Note: If you would like to use your own design for the front cover, you will need to select ‘The Spruce’ from page 5 of the cover designs.
- Select a theme for your cover. The theme will change the fonts, styles and images of your design.
- Check that the Title appears as you want it. This will be automatically entered from the information you already provided when setting up your novel.
- Choose a Front Cover Image from one of the thousands in the Cover Creator, or upload your own picture.
- Check that the Author Name appears as you want it.
- Write the blurb that you want to appear on the back cover of your book and paste it into the box in Back Cover Text.
- Some designs include an option to include a photo of the author on the back cover. If you would like to include an author photo, upload it here.
- Choose the colours for your book’s background and text.
- Note: If you would like to use your own front cover design, you can also upload it during this step. Your front cover file must be:
- JPEG or tiff file
- 25” x 9.5”
- At least 300dpi
- Cover file picture must include title and author name
- All text must be at least 0.5” from outer edge
- When you are happy with your design, click on Submit Cover.
Step Eight: Complete The Setup
When you are happy with your cover and the interior of your book, click on Submit my Files for Review.
- Your files will be carefully reviewed by CreateSpace. Within a day or two, you will receive an email to tell you the review has been completed. If there are any problems with your novel, you will have the opportunity to fix them. If your files are OK, you will have the option to check a digital proof copy of your novel.
- Carefully review your digital proof to make sure it is exactly as you want it. You can choose to print the digital proof or review it on the screen.
- When you are happy with it, click on ‘Approve.’
Step Nine: Order Your Copies
You are now ready to order your copies of your book. Go to the Member Dashboard, click on ‘Order Copies’ and complete the ordering information. Select the number of copies you would like.
- You will need to pay for the shipping and any copies that you order. Complete the payment and shipping details.
- For most student novels, the cost will be around $2-$3 per copy. Shipping to Thailand usually costs around $20, but is less for shipping to a US address.
- You can order additional copies at any time.
- Follow the guidelines on CreateSpace if you would like to make your novel available for sale on Amazon.
This is optional. You do not have to list your book on Amazon, but if you choose to, you can take this step at any time. If you do not intend to sell your book on Amazon, you can ignore the request for tax information that will pop up from time to time.
Video Guides
https://youtu.be/lUXqqvX25bQ
https://youtu.be/4JF3Tb85Xuw
https://youtu.be/oaYZqMyfF1E
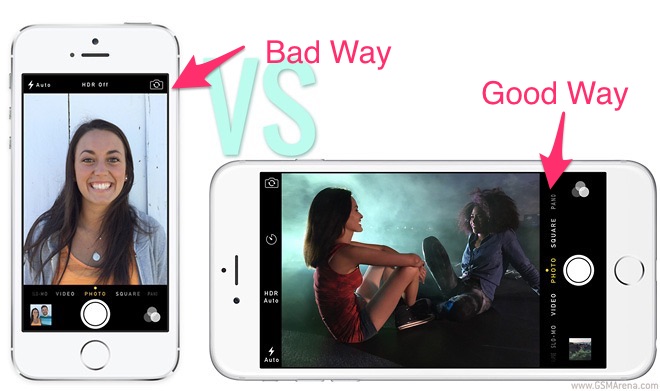
Shooting MS Got Talent Videos
The MS Got Talent show is coming up and the Arts Council welcomes your video submissions of students doing talented things. These videos will show in between talent exhibitions.
Tips for Shooting and Recording
- Hold the camera or phone horizontal instead of vertical. This makes for a consistent look for everybody and better quality.
- Have the person doing the talent fill as much of the screen as possible.
- Don’t worry about sound, we are going to add music and cut out any sounds
 Delivering the Files
Please upload any video files to a Google Drive folder and share it with me.
Need help?
Michael can help film during the following advisories
- Thursday, November 30
- Monday, December 4
- Thursday, December 7